有鼎鼎大名的resin.io 所提共的燒錄軟體Etcher, 可以使用他進行燒錄,
2017年9月13日 星期三

2017年9月6日 星期三
[Mac] 如何使用Machine Time machine 回復系統或 還原檔案
1. Time Machine 的備份檢查:
在menubar 的time machine 按鈕處,按下”alt(option)” + 滑鼠右鍵,就會出現驗證備份,如果沒按住option的話,就是出現略過此備份的選項
,其實這個option key+menu 滑鼠右鍵,都會出現很多Mac 隱藏功能
2.還元檔案,其實很簡單,選擇進入時光機器後,右邊列就會出現一個時間軸,上面的時間就是系統有備份檔的時間,這時候就選擇你要還原的時間點,然後按住
“space bar” 即會切換到你要還原的檔案時間點
3.回復係桶,就重新開機,然後進入回復模式”cmd” + “ r” ,然後選擇從時光機回復系統即可
2017年9月4日 星期一
2011MBP late 風扇噪音跟更換記錄
依照前幾篇的紀錄解決了顯示卡的問題,我的2011 late MBP繼續工作了幾個星期,單不知道是否因為停用了顯示卡,所以風扇的負擔變大了,突然出現了噪音,雖然去下載了smcFanControl來控制風扇
狀況還是沒改善,至少嘗試去找看看有沒新的風扇,之好去淘寶上找,找到一家賣一對85RMB,話算大概300多塊,簡單詢問店家是否可以幫我值送台灣,他也願意,舊請他幫我用順風到運付款幫我值送,
第三天就送達,品質速度都很滿意,目前用了幾天,整體滿意度還不錯
2017年8月31日 星期四
[Mac] 節省你打字時間的autojump (取代cd)
github: https://github.com/wting/autojump
安裝:
#brew install autojump
用法:
1.最簡單的,直接用
#j v5 ==>跳到含有v5 的目錄
2.要直接進入child directory
#jc v5
3.開始用finder 開啟
#jo v5
4.多層次搜尋
例如你的目錄中有 30 /doc/test/v5
10 /doc/opp/v5
# j v5 會直接到 優先順序高的/doc/opp/v5
但事實上你是要到/doc/test/v5 就可以使用下列的多層次條件下法
#j test v5
像要看你的目錄存放的順序就使用
#j -s
另外也可以增加目錄的priority 分數,下列就會增加50分到/doc/test/v5
# j -i 50 /doc/test/v5
查詢指令
#j -h
2017年8月24日 星期四
2011 Late MacBook Pro 強制停用AMD顯卡方法 (號稱100%解決 顯示卡故障問題)
前情提要:
2011 mbp 顯卡問題,之前Apple 有召修方案,但目前已經不在召修名單,這個問題是設計上的問題,即使你送給外面的廠商維修,隔了一陣子還是會在故障,我個人的2011 late MBP 筆電已經因為顯卡問題,更換過三次主機板,但目前一樣又出現問題,癥狀就是開機會停留在灰色畫面,或者有時候會出現藍色值條紋路
原始參考來源:
Force 2011 MacBook Pro 8,2 with failed AMD GPU to ALWAYS use Intel integrated GPU (EFI variable fix)
https://forums.macrumors.com/threads/force-2011-macbook-pro-8-2-with-failed-amd-gpu-to-always-use-intel-integrated-gpu-efi-variable-fix.2037591/
說明:下列這些步驟,主要目的是要把外接顯卡的driver移除,但因為Mac 系統有保護(SIP),所以前面的步驟就是要把SIP disable
提示: 完成後,記得不要再reset SMC ,要是不小心執行的SMC reset , 記得在重新執行nvram 強制Mac開機不使用外顯卡
Steps:
1)cmd + R => Enter recovery model (回復模式)
2)Disalbe SIP (開啟終端機,停止系統檔案完整性檢查)
#csrutil disable
3)reboot to enter single user model
cmd+s ,enter single user model (類似安全模式)
4)重新remount 硬碟變成可以讀寫
#/sbin/mount -uw /
5)強制Mac 開機不使用外顯卡
#sudo nvram fa4ce28d-b62f-4c99-9cc3-6815686e30f9:gpu-power-prefs=%01
5)移除ADM driver
# mkdir -p /ADM_Kexts (強制產生一個暫存driver 目錄)
#mv -v /System/Library/Extensions/AMDRadeonX3000.kext /AMD_Kexts/
6)重新開機,就完成收工
2017年8月22日 星期二
How to clone vmware image inside vmware Esxi server through ssh terminal.
最近拿到兩台舊版的VMWARE Esxi server 可以用來玩系統,發現要deploy ova tempalte實在有夠麻煩,查了一下似乎
可以直接再vwmare 裡面直接clone image 這樣速度最快,下列是從vmware 官網直接複製天上的說明步驟
Cloning a virtual machine disk without delta files or snapshots
To clone a virtual machine disk using the ESXi/ESX host terminal:
- Log in to the terminal of the ESXi/ESX host. (需要先開啟ssh 的服務 Configuration-> Security Profile : Enable SSH)
- Navigate to the virtual machine's directory using the cd command. It is located at:
/vmfs/volumes/source_datastore/virtual_machine/ (我的預設是/vmfs/volumes/datastore1) - Confirm the destination directory where the clone will be copied to. Create this directory, if required.
For example, if this destination directory does not exist:
/vmfs/volumes/destination_datastore/virtual_machine/
Create the directory using this command:
mkdir /vmfs/volumes/destination_datastore/virtual_machine/ - Clone the virtual hard disk using the vmkfstools -i command after shutting down the virtual machine:
# vmkfstools -i /vmfs/volumes/Storage1/examplevm/examplevm.vmdk /vmfs/volumes/Storage2/examplevm_clone.vmdk
You see output similar to:
Destination disk format: VMFS thick
Cloning disk '/vmfs/volumes/Storage1 (3)/examplevm/examplevm.vmdk'...
Clone: 100% done.
Notes:
- Encapsulate objects with quotes where appropriate to ensure spaces and other special characters are interpreted correctly.
- By default, the vmkfstools -i command will create a destination thick provisioned disk. If you want the destination disk to be thin provisioned, add -d thinto the end of the preceding command.
For example:
# vmkfstools -i /vmfs/volumes/Storage1/examplevm/examplevm.vmdk /vmfs/volumes/Storage2/examplevm_clone.vmdk -d thin
Cloning a virtual machine disk with delta files or snapshots
To clone a virtual machine disk using the ESXi/ESX host terminal:
- Log in to the ESXi/ESX host's terminal.
- Navigate to the virtual machine's directory using the cd command. It is located at:
/vmfs/volumes/source_datastore/virtual_machine/ - Confirm the destination directory where the clone will be copied to. Create this directory, if required.
For example, if this destination directory does not exist:
/vmfs/volumes/destination_datastore/virtual_machine/
Create the directory using this command:
mkdir /vmfs/volumes/destination_datastore/virtual_machine/ - Clone the virtual hard disk from its current snapshot delta point using the vmkfstools -i command.
# vmkfstools -i /vmfs/volumes/Storage1/examplevm/examplevm-000003.vmdk /vmfs/volumes/Storage2/examplevm_clone.vmdk
You see output similar to:
Destination disk format: VMFS thick
Cloning disk '/vmfs/volumes/Storage1 (3)/examplevm/examplevm-000003.vmdk'...
Clone: 100% done.
2017年8月14日 星期一
2011 late MBP 電池耐用度
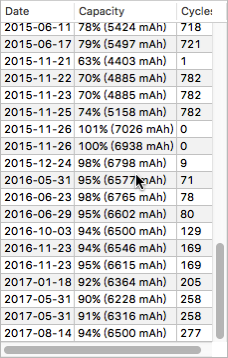
我目前使用的電腦是2011 年末的15吋 MBP, 原廠電池在使用了四年後,達到電池循環782次後,壽終正寢,我網路上訂購電池,自行更換後,目前又繼續工作了兩年,電池循環達到277次,不過這兩年來因為家庭的緣故,我電腦使用量已經不像以前那麼的大,目前遇到的問題就是顯卡已經又開始出現問題,前前後後已經因為顯卡問題更換了三次主機板,這次不知道可以再撐多久
訂閱:
文章 (Atom)